


Technology: The Less You Know the Better?
I'm sure everyone is now aware of GPS technologies and tracking techniques these days, with the release of numerous documents (even lawsuits) on big name companies like Apple, Microsoft, and Google. Yes, 2011 was a good year for eye-opening propaganda and attempted mass hysteria in the News world. But what you may not have known is actually how long this problem has been going on, or better yet, what devices have this problem/capability. Even more so, how to pull out this aggregate data for use.
Let me explain a bit with a quick history lesson. If you're in a hurry just scroll down a bit.
Exif (Exchangeable Image File Format)
The Japan Electronic Industries Development Association published Version 2.1 of the specification in June 1998 with an initial specification release in 1995. Yes, that is correct. The 1998 version is 2.1, which is what many hardware manufacturers are (somewhat) implementing today in devices such as cameras, scanners, and smartphones!
Now, the Exif metadata is stored in the APP1 marker of JPG files, so if you are looking at the picture in a hex/text editor, you can search for segment marker 0xFFE1.
Tips
- Each hardware manufacturer may implement Exif GPS data differently, so you will have to check the model and perform different calculations for each device to convert to latitude and longitude.
- If your device operates as expected, you will have to enable GPS communication before your pictures will have the Exif metadata embedded in it.
- The accuracy of GPS data within the picture relies on a few things: your calculation, the device's ability to pinpoint your location, and the implementation your hardware manufacturer took.
- The JPEG/Exif format is one of the most commonly saved file types of digital cameras.
- Before you go checking Facebook for that crazy girl's pictures you like, keep in mind that most websites scrub uploaded documents/images to help mitigate potential stalking.
- Make sure Mbstring is loaded before Exif in your php.ini.
- If you are on Windows XP, know that copying an image from your camera device may inadvertently remove Exif data from the picture.
- When using the Google Maps APIs, be sure to note that south and west are negative values.
- I am not going through the creation of any webpage, permissions on RW access of the web server, or my calculations on device specific conversions from degrees/minutes/seconds to latitude and longitude. Some things you should find out for yourself!
Warnings
- Exif metadata inside of JPEG is restricted in size to 64 kB because the information must be contained within a single JPEG APP1 segment.
- Exif data may disappear or become corrupt if you modify the picture in photo editing software or simply copy it from your device to the computer on some OSs.
- Using this data in a malicious manor may result in legal actions!
- Using the Google Maps API requires a application key so excessive requests from the same IP may result in a denial of the request.
Setting Up the Environment
You will need PHP installed at the minimum.
Now there are many avenues to getting this done, each relies on your operating system and the method for running the 'application'.
If you are on a Windows machine and wish to do everything through a web server, I would advise you to download the Microsoft Web Platform Installer (WPI), install IIS through the Add/Remove Features, and setup your server through the IIS manager console MMC. The WPI will assist you on installing PHP and configuring it with IIS. If you just want PHP installed as a command line tool, find your way over to their website and install the MSI file.
If you are on a *nix system, you may use your distributions package manager to satisfy the installation of PHP and Apache or just PHP. If you are unsure of how to do this, I would advise you to poke around that OS's forum. There are so many different ways, I refuse to cover all of them in this article.
Once your environment is established, you may begin examining pictures.
Step 1 Taking the Picture
As explained in the tips section above, you will need to have a GPS sensor available and enabled on your device. You may then perform whatever means will allow you to snap your picture.
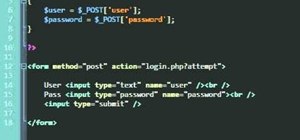
Step 2 Get the Image on Your Machine
If you are using a remote web server for this example, you may find it best to create a simple HTML form to allow uploading the image. On the other hand, if you are doing everything local, you may find it easier to just copy your picture from the device to your machine and place it in a folder that PHP can access with a minimum of read access. Make sure to look over the tips section above for OS-specific issues.
Step 3 Retrieve Metadata
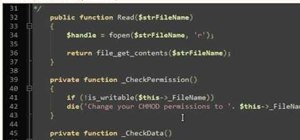
There are five functions in PHP's Exif Library that you may use to play with pictures:
In this example, I will cover exif_read_data, since that is the focus of this article.
The function exif_read_data returns either an associative array or FALSE if there is an absence of present data. This function takes a filename string as its mandatory argument with the option to specify the header section to retrieve, whether or not to return each sections data as an array, and whether or not to read the thumbnail. For simplicity, we will be requesting the EXIF section specifically so that our call will look something like:
exif_read_data("myfile.jpg","EXIF")
By storing the result in a variable, we can then perform any need calculations, data retrieval, and/or data storage. However, for this example, I am just going to cover how to display the results in a webpage, which can be done like so:
print_r($myvar)
Step 4 Have Fun with the Results
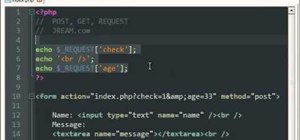
Now, there are many things you can do with the results of GPS location data. My personal favorite is using Google Maps to mark the location the image was taken at. You can look over the Street View API to get information about crafting a URL to forward your users to here. If you do not wish to use the Street View API, you can also create static maps by reading this link. Or just change the location value of this GET request:
http://maps.googleapis.com/maps/api/streetview?size=600x300&location=latitudevalue,longitudevalue&sensor=false
By making use of the header function in PHP, you can forward your application users to the custom URI, like so:
header("Location: http://maps.googleapis.com/maps/api/streetview?size=600x480&location=38.8900,77.0300&sensor=false");
header("Location: http://maps.googleapis.com/maps/api/staticmap?center=38.8900,-77.0300&zoom=8&size=400x400&sensor=false");
As always, happy reading!
Just updated your iPhone? You'll find new emoji, enhanced security, podcast transcripts, Apple Cash virtual numbers, and other useful features. There are even new additions hidden within Safari. Find out what's new and changed on your iPhone with the iOS 17.4 update.


1 Comment
If you just want a quick and easy way to visualise an image's location, I would suggest http://www.pic2map.com which actually utilizes EXIF GPS information to map a photo. For photos without GPS data, it can be used as a simple online EXIF viewer, that shows some basic information.
I hope more cameras start using geotagging like smartphones do…
Share Your Thoughts